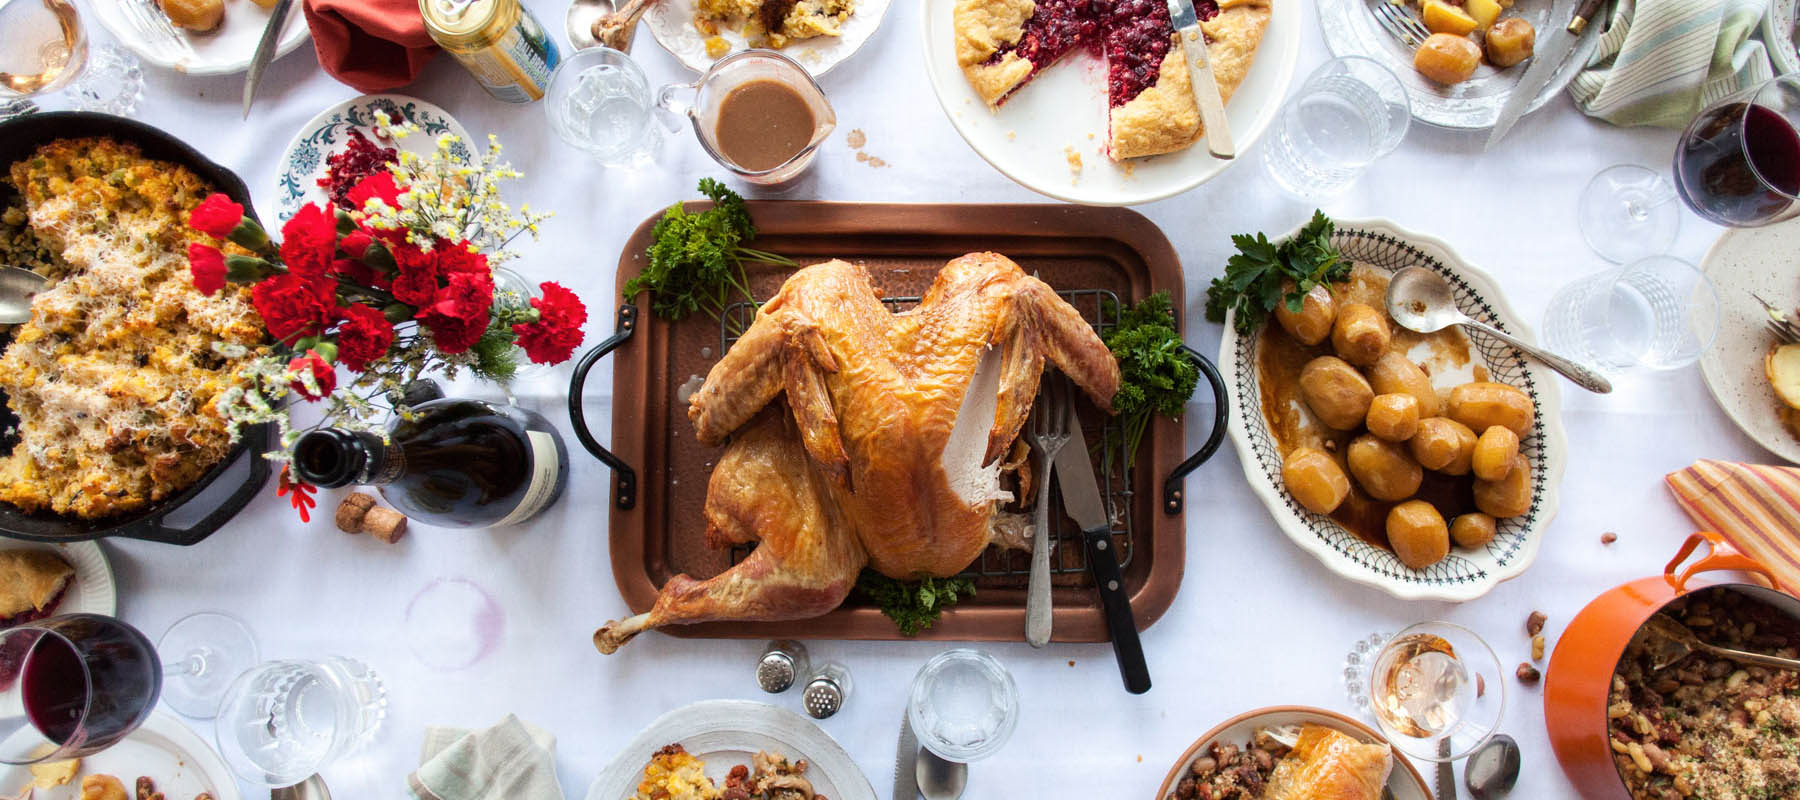
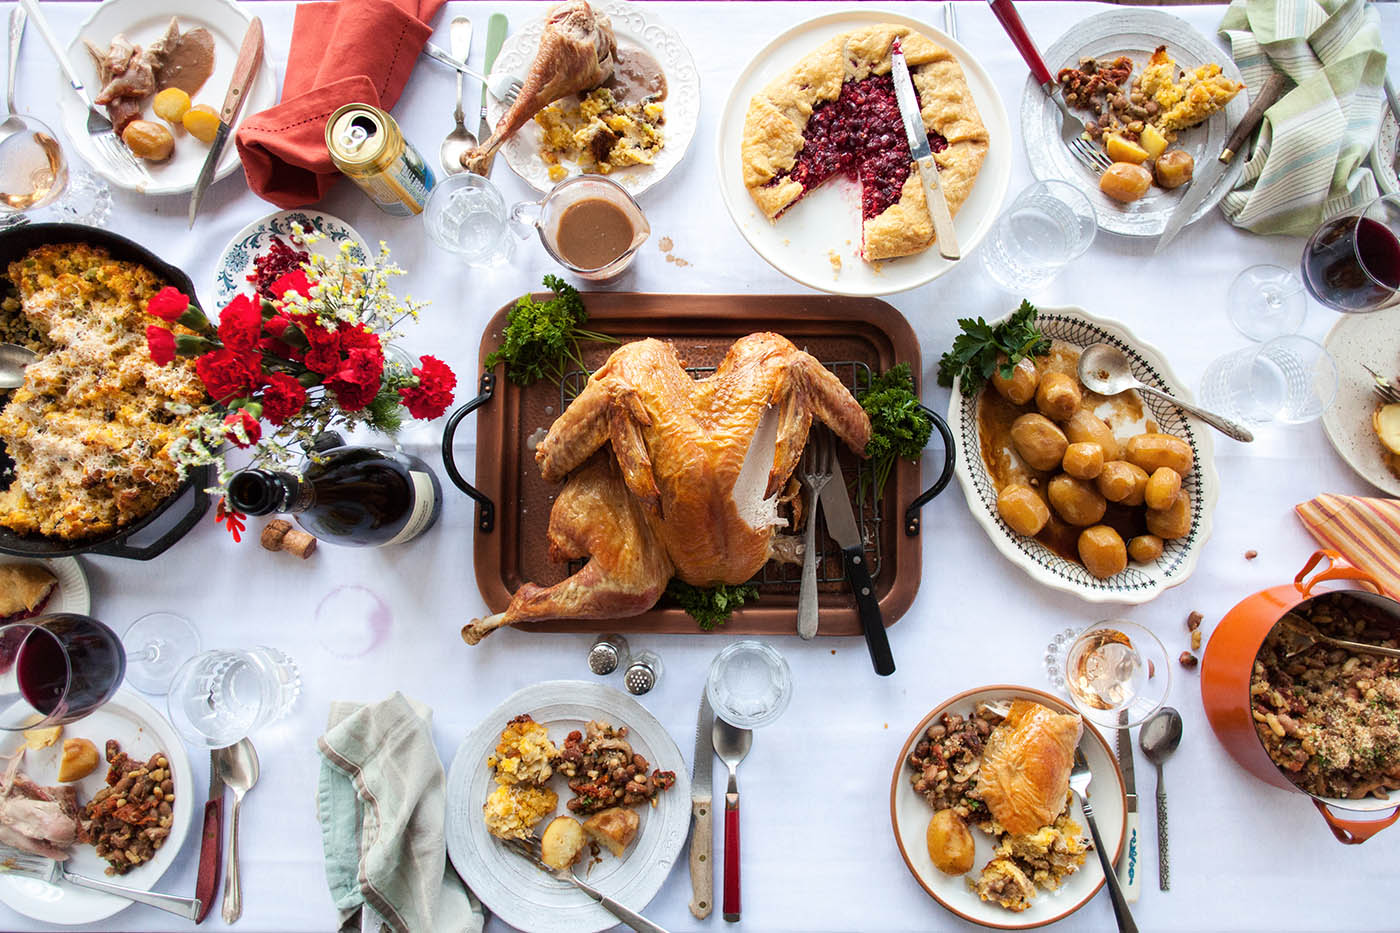
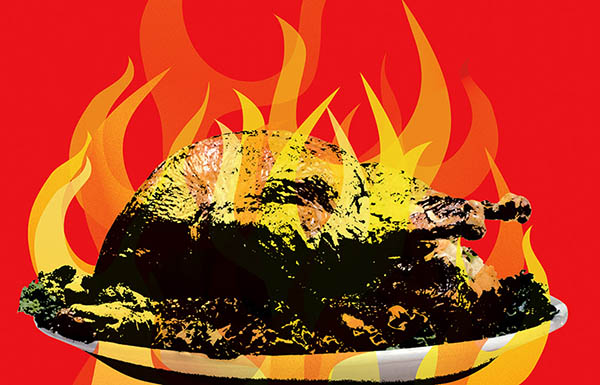
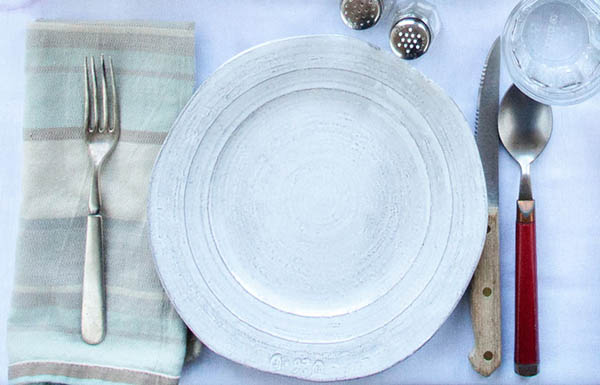
This Thanksgiving, something will go wrong. Something may spill. Disagreements might occur. A dish may not turn out just right. (Hey, our first attempt at the cranberry gel recipe here didn't set; it happens.) And you know what, everything will be all right.
Below, you'll find holiday recipes from top Seattle-area chefs. Each has a different flavor profile and style — mix and match with your traditional favorites. The chefs have also helpfully included their tips to simplify their recipes to reduce holiday stress.
Cook, eat, drink, and make messes this year — and be merry, no matter what.
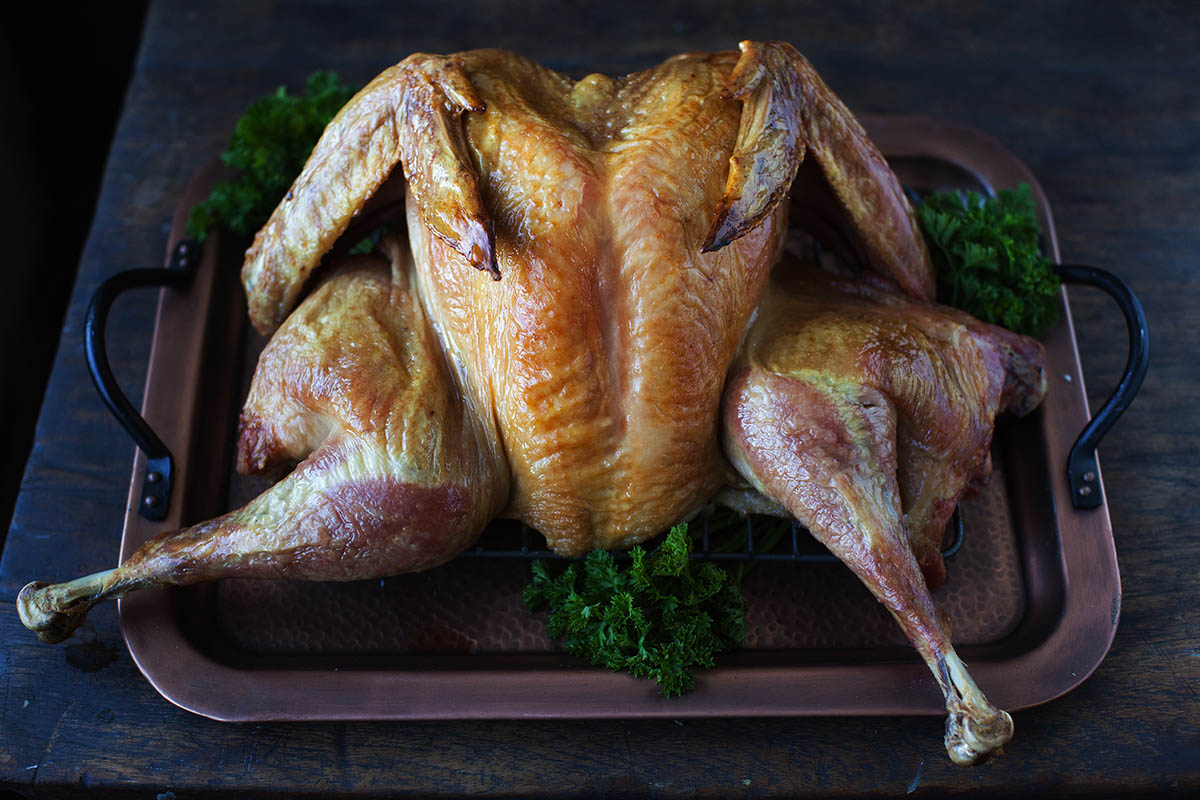
“One of the things many people dislike about turkey is that is often too dry — by the time the legs and thighs (the best part) are done cooking, the breast is overdone. Spatchcocking (also known as butterflying) a bird, by removing the backbone, will yield a juicier, crispier final product. And because you are exposing more surface area to direct heat, the turkey will cook in considerably less time — about 90 minutes versus a few hours.”
Brady's recipe
Simplify
“We always brine our birds first, which is the process of creating a salt solution that both seasons and breaks down the internal protein structure, which means the meat will be more tender. It takes some time and quite a bit of space, so remember to start early. If you prefer a dry brine option, check out the ‘simplify’ version of this recipe.”
1 fresh turkey
Kosher salt
White sugar
Assorted vegetables, such as celery, onion, carrot (optional)
For brining:
We use a 3 percent salt and 1.5 percent sugar by weight ratio. More simply put, for every 100 grams of water, we dissolve 3 grams of salt and 1.5 grams of sugar at a boil, then cool the solution.
Depending of the size of your bird, you will need a large container (like a clean 5-gallon bucket). Place the bird in the container, and place enough of the brine to cover the turkey (make sure the brine is cold). Keep the turkey in the brine, refrigerated, for 24-36 hours, longer if it's a larger turkey. Remove from brine and let it air dry in the refrigerator overnight (so be sure to start the process one day ahead).
Pull the turkey a few hours ahead of roasting and place on the kitchen counter to allow the turkey to temper, which will allow more even cooking.
For spatchcocking:
Using poultry scissors, with the turkey breast-side down, cut along both sides of the backbone to remove. You can save the backbone for stock or for gravy (one of the downsides to this is you can't stuff the bird).
Trim away any excess fat along the neck of the bird and discard.
Flip the bird over, breast-side up, and using the palm of your hand, press down on the sternum of the turkey. You should hear the breast “pop” and the turkey should lay almost perfectly flat.
Place the turkey on a roasting rack over a sheet pan. If you want, you can chop vegetables, such as onions, celery and carrot to place under the rack and catch the drippings. Use these vegetables for your gravy or stuffing, if you like.
Roast in a 400-degree oven for about 90 minutes — or until the breast reads 140 degrees and the legs read 150 degrees. Remove from the oven and let rest for one hour — the bird should continue to cook and reach an internal temperature of 150 degrees for the breast and 160 degrees for the legs.
Carve and serve!
When you buy the turkey, have your butcher butterfly it for you. (If they cannot, for whatever reason, see instructions in the full version of this recipe.)
1 fresh turkey
Kosher salt
Assorted vegetables, such as celery, onion, carrot (optional)
The night before you plan to roast the turkey, salt it using kosher salt. Make it rain a generous but even amount of salt covering the entire bird — the bird should be well-coated but not encrusted.
Leave the salted turkey in the refrigerator overnight, then pull it out a few hours ahead of roasting and place on the kitchen counter to allow it to temper, which will allow a more even cooking.
Place the turkey, spread out flat, on a roasting rack over a sheet pan. If you want, you can chop vegetables, such as onions, celery and carrot to place under the rack and catch the drippings. Use these vegetables for your gravy or stuffing, if you like.
Roast in a 400-degree oven for about 90 minutes — or until the breast reads 140 degrees and the legs read 150 degrees. Remove from the oven and let rest for one hour — the bird should continue to cook and reach an internal temperature of 150 degrees for the breast and 160 degrees for the legs.
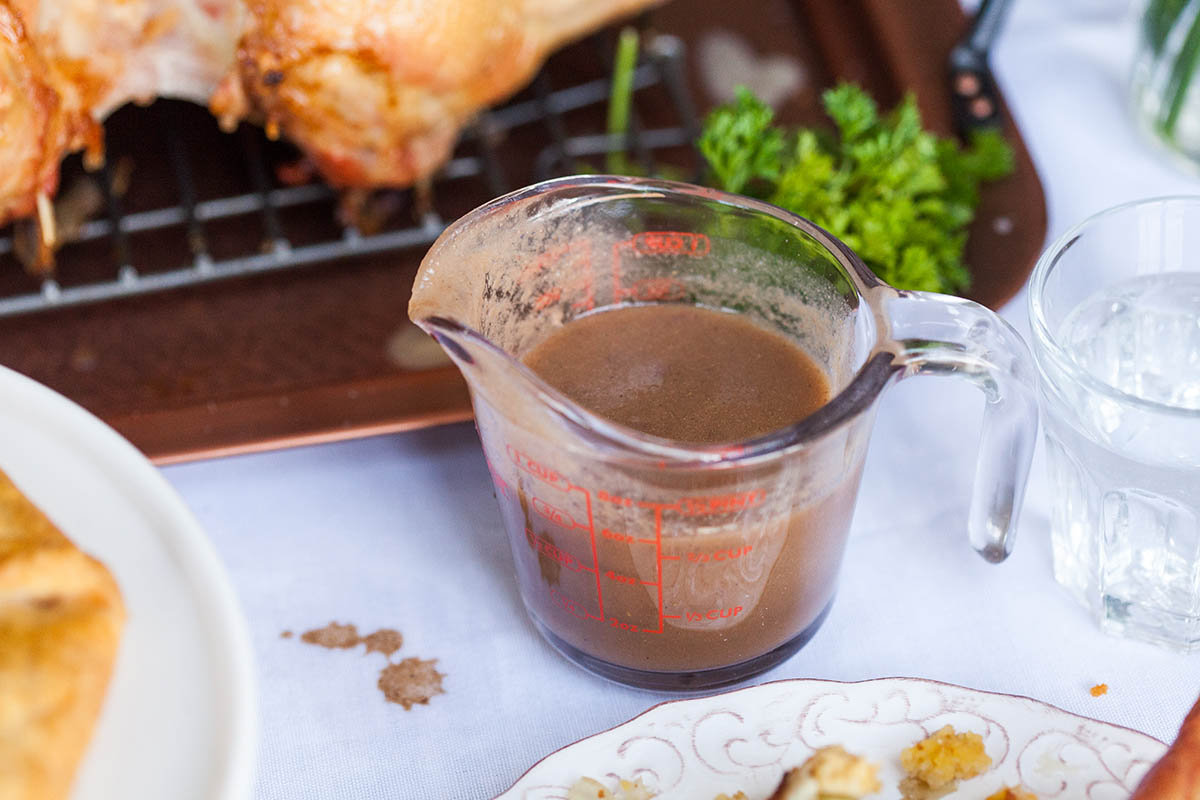
“Whether you choose to roast a chicken or a turkey (or duck or goose!) this sauce works well for all. I don’t love a starch thickened sauce personally, so I let the natural proteins in the stock and reduction do the work. It takes time but is easily done ahead. This sauce base could be made a month in advance and frozen or made a day ahead and refrigerated.”
Holly's recipe
Simplify
Serves 6-8
For the chicken brodo base:
1 gallon chicken stock, strained (this can be a homemade stock or store-bought; no bouillon!)
2 bone-in chicken thighs, skin and fat removed
2-6 ounces rind of Parmigiano-Reggiano
2 sprigs thyme
2 flat leaf parsley stems
½ medium yellow onion, cut in half, skin on
In a heavy sauce pot, heat stock, chicken thighs, cheese rinds, thyme, parsley and onion. Bring to a simmer. Skim impurities off the top and continue to cook at a low simmer for two hours. Skim off the top often.
Remove from heat and strain.
Heat strained liquid over medium to medium-high heat and reduce to a simmer. Reduce the stock to approximately 1 ½ to 2 cups, about another hour. The liquid should be thickened, delicious and dark amber in color.
If it seems thick, you can add stock and continue to reduce, or adjust in the future.
This sauce can be refrigerated or frozen at this stage, or turned into your finished sauce.
For the finished gravy:
1 medium shallot, finely minced
1 cup Marsala, red wine, dry sherry or anything of your choosing (this could be a fruit juice; if substituting a liquor like bourbon, cut the quantity in half)
Sherry vinegar or a fruit jam, such as black currant (optional)
In heavy medium saucepan, heat 1 tablespoon butter over medium heat. As it begins to melt, add shallots and stir to coat.
Sweat shallots 2-3 minutes until tender but not colored. Lower heat, if necessary.
Deglaze with the wine or liquid of choice and simmer until the liquid reduces by a third. Add the reduced brodo and cook until consistency is thickened slightly, to form a sauce.
Turn off heat and whisk in 1 tablespoon of butter at a time. Taste and continue adding more butter if desired.
Optional: At this time, a dash of sherry vinegar or a dollop of a fruit puree, such as black or red currant jam, can be added to enliven the sauce.
This sauce can be reheated gently (no boiling) if any is leftover.
Tip: Save your rinds from Parmigiano-Reggiano in the freezer for making brodo. If you don’t have a cache on hand buy them at Whole Foods, Metropolitan market or ask for them at PCC. Use the real stuff, Italian Parmigiano-Reggiano!
Serves 6-8
For the chicken brodo base:
1 gallon chicken stock, strained (this can be a homemade stock or store-bought; no bouillon!)
2 bone-in chicken thighs, skin and fat removed
2-6 ounces rind of Parmigiano-Reggiano
2 sprigs thyme
2 flat leaf parsley stems
½ medium yellow onion, cut in half, skin on
In a heavy sauce pot, heat stock, chicken thighs, cheese rinds, thyme, parsley and onion. Bring to a simmer. Skim impurities off the top and continue to cook at a low simmer for two hours. Skim off the top often.
Remove from heat and strain.
Heat strained liquid over medium to medium-high heat and reduce to a simmer. Reduce the stock to approximately 1 ½ to 2 cups, about another hour. The liquid should be thickened, delicious and dark amber in color.
If it seems thick, you can add stock and continue to reduce, or adjust in the future.
This sauce can be refrigerated or frozen at this stage, or turned into your finished sauce.
For the finished gravy:
Drippings from the roasted bird
1 teaspoon champagne or sherry vinegar
1 sprig rosemary or thyme
When your turkey, or other bird, is done roasting, remove it from the pan, and pour the drippings into a bowl or measuring cup. Let the drippings sit, and skim the fat off the top.
Use the chicken brodo base to deglaze the roasting pan over medium heat, scraping off small browned bits from the bottom of the pan. Add a splash of the vinegar and rosemary or thyme, and continue to make a classic gravy from here, adding in drippings to reach the desired consistency.
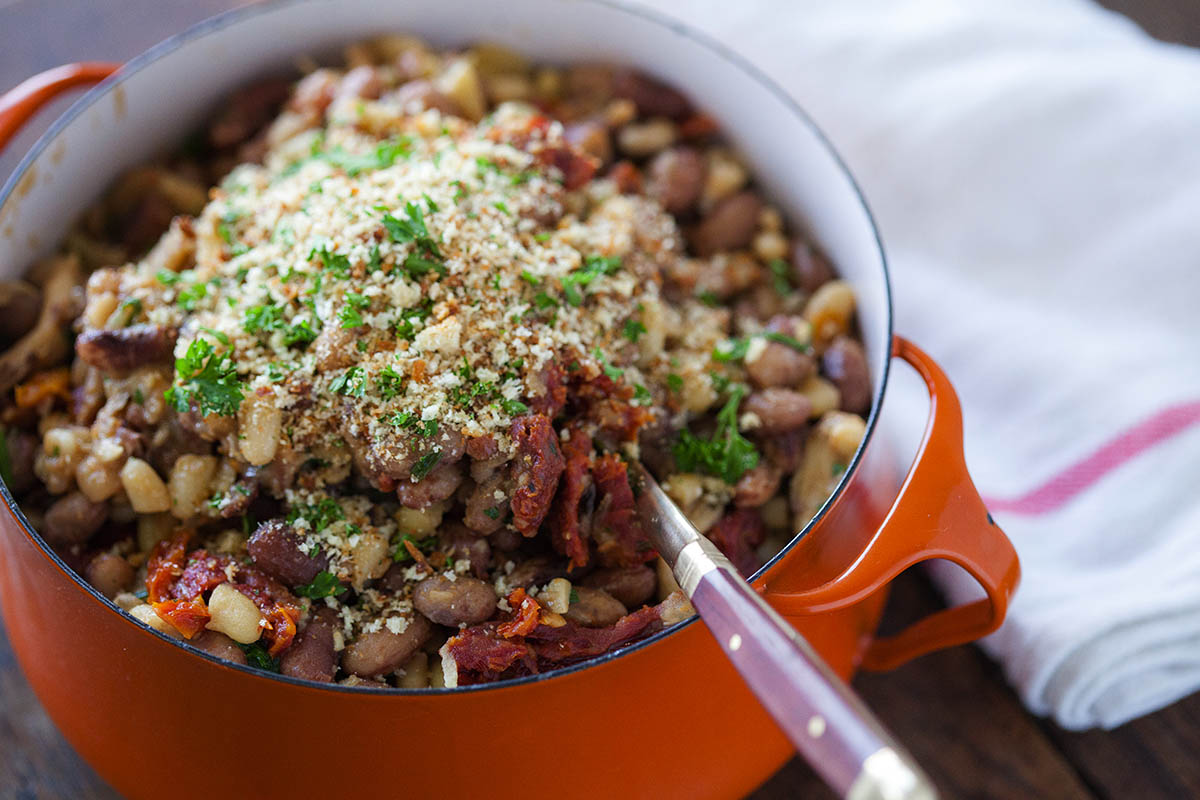
Chef Maria Hines, owner of Tilth, Agrodolce and Young American Ale House, says this vegetarian dish has become the most sought-after recipe at Tilth, as even meat lovers fawn over it. The comment she hears most: “How can you say this is vegetarian when there is meat in here?” The chewy texture of the mushrooms combined with the smoky beans gives the dish the illusion of meat.
Note: You can buy this dish at Tilth over the holidays if you pre-order it two days in advance. They will send you home with instructions on how to heat and serve.
Maria's recipe
Simplify
Note: This recipe will take two days to make. Start early! Or, see the “simplify” version, which can be done in one day.
Serves 8
For the smoked heirloom beans:
⅔ cup heirloom beans, dried (your choice)
⅔ cup heirloom beans, dried (a second variety of your choice)
⅔ cup heirloom beans, dried (a third variety of your choice)
3 carrots (peel, leave whole, cut off tops)
3 celery stalks (leave whole, pick off leaves)
1 ½ yellow onions (peeled, cut in half and made into three skewers, so they don’t separate and float around)
¼-½ teaspoon liquid smoke (optional, only necessary if you don’t have a smoker)
Soak beans overnight, in separate bowls.
Cook them separately in deep pans with twice as much liquid to beans. You want to cook them separately because each variety will be a slightly different size and you want to ensure perfect doneness.
Cover beans with water, and add carrot, celery, onion, garlic and sachet to each pan. Cover with foil and cook in oven at 300 degrees, about 2 hours, or until the beans are completely tender.
When fully cooked, season beans with salt and pepper to taste, while leaving them in the liquid. (You have to season beans after they’re cooked. If you do it beforehand, they will remain crunchy.)
Strain beans, reserving liquid, and combine all three varieties. Smoke beans with apple wood chips in a hot smoker for 5 minutes on medium heat. (If you don’t own a smoker, stir in small amounts of liquid smoke in batches ¼ teaspoon or less at a time, until you reach the desired flavor. Liquid smoke is strong; don’t overdo it!)
Note: The prepared beans will hold in the refrigerator for at least 5 days. Keep them in their cooking liquid, to keep them from drying out.
For the truffle butter:
3 ½ ounces butter
1 ounce black truffle oil
1 ounce black truffle peelings
Salt
Pepper
Cut butter into chunks and let it soften.
Whip butter with a mixer, adding in truffle oil, truffle peelings, salt and pepper.
For the finished dish:
¼ cup stale brioche
2 tablespoons canola oil
1 medium shallot, minced
2 cloves garlic, minced
1 cup wild mushrooms, julienned (whatever you like: oyster mushrooms, chanterelles, trumpets, etc.)
1 tablespoon finely chopped chives
1 tablespoon finely chopped parsley
1 cup sun-dried tomatoes, julienned
Salt
Black pepper
Dry out stale brioche in oven until crispy, then pulverize in a food processor. Set aside.
Clean and saute the mushrooms in canola oil, shallot and garlic. Add parsley, chives, tomatoes and the beans. Saute the whole mixture with a little bit of the reserved bean liquid, and the truffle butter.
For garnish:
1 ounce truffle oil
Parsley
Transfer to a serving dish, and top with the brioche crumbs, truffle oil and parsley.
Note: Finding canned heirloom beans may prove to be difficult. The goal here is to have a few different colors and sizes of beans for variety. If you can’t find heirloom, try a mixture of beans such as great northern, cannellini, pinto or kidney.
Serves 8
For the smoked heirloom beans:
⅔ cup heirloom beans, canned (your choice)
⅔ cup heirloom beans, canned (a second variety of your choice)
⅔ cup heirloom beans, canned (a third variety of your choice)
2 tablespoons canola oil
½ yellow onion, diced
2 cloves garlic, minced
1 tablespoon thyme leaves
1 tablespoon parsley, finely chopped
1 teaspoon coriander
Salt
Pepper
¼-½ teaspoon liquid smoke (optional, only necessary if you don’t have a smoker)
Drain canned beans and reserve liquid.
Saute beans with canola oil, onion and garlic. Add thyme, parsley, coriander, and salt and pepper to taste.
Remove from heat, and stir in small amounts of liquid smoke, ¼ teaspoon or less at a time, until you reach the desired flavor. Liquid smoke is strong; don’t overdo it!
For the finished dish:
¼ cup stale brioche
2 tablespoons canola oil
1 medium shallot, minced
2 cloves garlic, minced
1 cup wild mushrooms, julienned (whatever you like: oyster mushrooms, chanterelles, trumpets, etc.)
1 tablespoon finely chopped chives
1 tablespoon finely chopped parsley
1 cup sun-dried tomatoes, julienned
3 ½ ounces black truffle butter
Salt
Black pepper
Dry out stale brioche in oven until crispy, then pulverize in a food processor. Set aside.
Clean and saute the mushrooms in canola oil, shallot and garlic. Add parsley, chives, tomatoes and the beans. Saute the whole mixture with a little bit of the reserved bean liquid, and the truffle butter.
For the garnish:
1 ounce truffle oil
Parsley
Transfer to a serving dish, and top with the brioche crumbs, truffle oil and parsley.
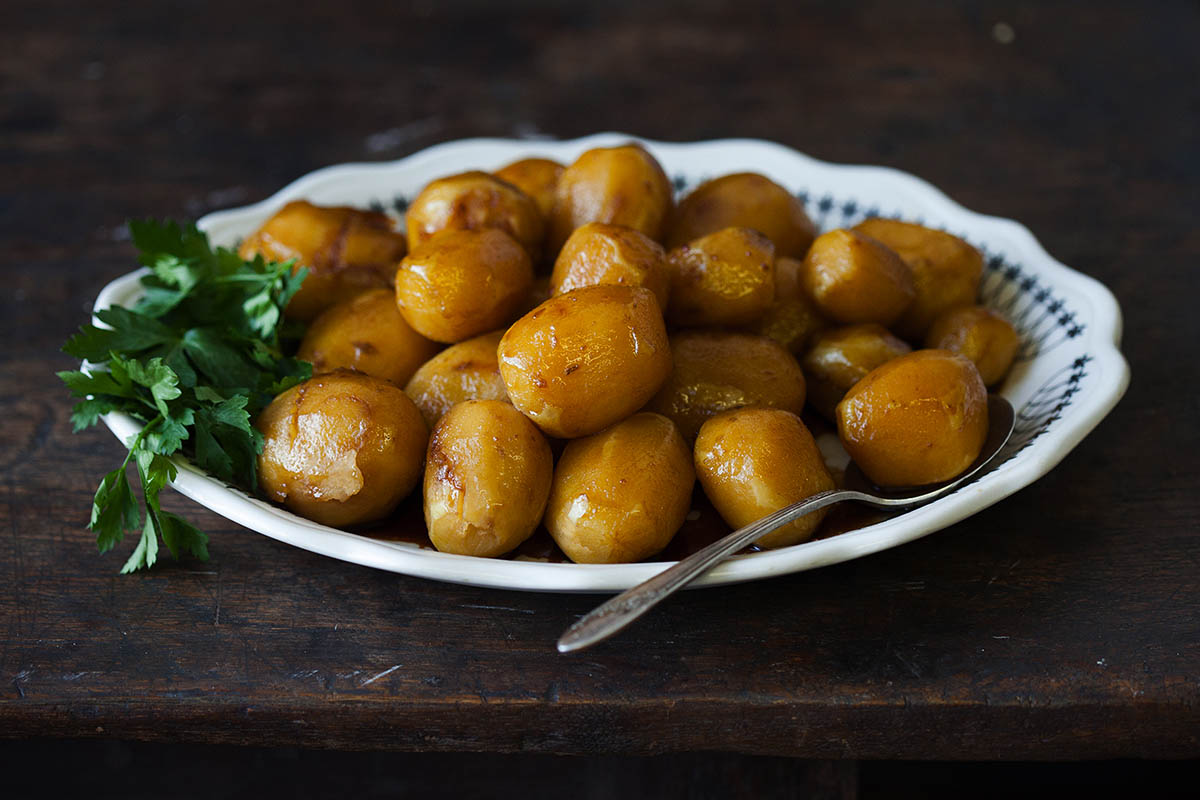
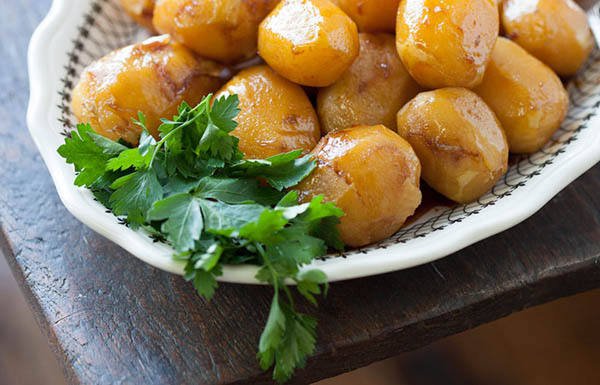
Shota Nakajima, chef/owner of Capitol Hill’s refined kaiseki restaurant Naka, provides this recipe that’s reminiscent of sweet potatoes but with a delicious, subtle complexity. A sticky, rich glaze made with soy sauce, sake and mirin makes the little Yukon Golds literally shine, and cooking them in the liquid that becomes the glaze gives them a lovely depth of flavor.
Shota's recipe
Simplify
Serves 12
2 ⅔ pounds small Yukon Gold potatoes (golf-ball sized)
Put the all the ingredients in a pot and bring to a boil. Reduce heat to medium-low and simmer for approximately 1 hour, until potatoes are cooked through (test one with a fork). Remove potatoes with a slotted spoon and set aside.
Adjust heat to continue cooking liquid at a low boil until reduced into a glaze, approximately ½ hour to 45 minutes; stir at the end to prevent burning.
Gently toss the potatoes in the glaze to coat, then transfer to serving bowl or platter, and drizzle remaining glaze over them.
Serves 12
2 ⅔ pounds small Yukon Gold potatoes (golf-ball sized)
5 cups dashi, made from dashi granules, or substitute chicken stock
⅓ cup sake or substitute white wine
⅓ cup sugar
⅓ cup soy sauce
⅓ cup mirin or substitute dry sherry, sweet marsala, or white wine with ¼ teaspoon sugar
⅓ cup butter
Peel the potatoes and rinse.
Put the all the ingredients in a pot and bring to a boil. Reduce heat to medium-low and simmer for approximately 1 hour, until potatoes are cooked through (test one with a fork). Remove potatoes with a slotted spoon and set aside.
Adjust heat to continue cooking liquid at a low boil until reduced into a glaze, approximately ½ hour to 45 minutes; stir at the end to prevent burning.
Gently toss the potatoes in the glaze to coat, then transfer to serving bowl or platter, and drizzle remaining glaze over them.
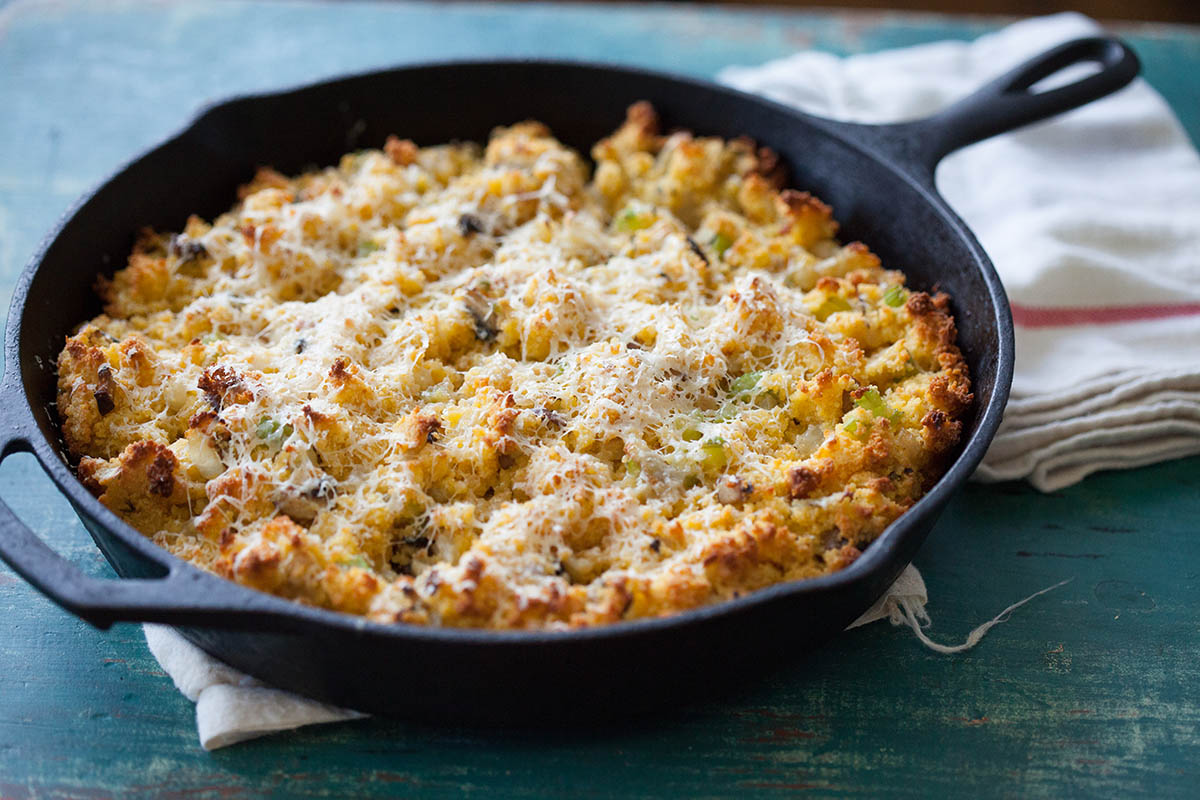
Edouardo Jordan, chef/owner of Salare in Ravenna, developed this recipe as an homage to his grandmother’s and mother’s cooking. He grew up on Jiffy cornbread, used in the “simplify” version of this recipe. But if you’d like to make it from scratch, he offers his recipe, which he’s spent years perfecting.
Edouardo's recipe
Simplify
For the cornbread:
1 ⅓ cup coarse-grind cornmeal
1 cup fine or medium-grind cornmeal
2 cups all-purpose flour
⅔ cup light brown sugar
1 teaspoon Kosher salt
2 teaspoons baking soda
2 cups whey or buttermilk
1 ⅓ grapeseed or other neutral oil
2 eggs
Place seasoned cast-iron corn pan or two 10-inch cast-iron skillets in a 350-degree oven to heat.
Mix all the dry ingredients in a stainless-steel bowl. Make sure to break up the brown sugar.
Whisk together buttermilk, oil and eggs.
With a rubber spatula, fold the buttermilk mixture into the cornmeal mixture, until there are no dry lumps.
Spoon or pipe the batter into the cavities of the corn pan, or pour into the skillet.
Bake on convection mode about 11 minutes (if using corn pan) or 18 to 20 minutes (if using skillet), or until the cornbread is lightly golden brown on top. Bake slightly longer if not using a convection oven. Cool.
Crumble cornbread into large chunks. Dry in a 350-degree oven for 10 minutes. Cool.
For the dressing:
½ cup celery, small dice
¾ cup onion, small dice
3 cloves garlic, minced
½ cup fennel, small dice
⅓ pound chicken gizzards (or substitute ½ cup mushrooms)
In pan, saute all the vegetables, gizzards, salt,and pepper with the olive oil until tender. Add in chopped sage and picked thyme in final stage of cooking. If using mushrooms as a substitution, cook until the mushrooms have released all moisture.
In a separate bowl, beat stock and eggs and pour over cornbread. Add sautéed vegetables and gently mix until combined.
Spray a casserole dish or cast-iron skillet with cooking spray and mold mixture into pan.
Bake at 350 degrees for 30-40 minutes until set and golden brown. Garnish with Parmesan and bake for an additional 5 minutes to melt.
3 boxes Jiffy cornbread mix
½ cup celery, small dice
¾ cup onion, small dice
3 cloves garlic, minced
½ cup fennel, small dice
⅓ pound chicken gizzards (or substitute ½ cup mushrooms)
Make cornbread as directed on box. Cool on rack. Crumble cornbread into large chunks. Dry in a 350-degree oven for 10 minutes. Cool.
Place dried cornbread in large bowl.
In pan, saute all the vegetables, gizzards, salt, and pepper with the olive oil until tender. Add in chopped sage and picked thyme in final stage of cooking. If using mushrooms as a substitution, cook until the mushrooms have released all moisture.
In a separate bowl, beat stock and eggs and pour over cornbread. Add sautéed vegetables and gently mix until combined.
Spray a casserole dish or cast-iron skillet with cooking spray and mold mixture into pan.
Bake at 350 degrees for 30-40 minutes until set and golden brown. Garnish with Parmesan and bake for an additional 5 minutes to melt.
For a fun and fancy twist on cranberry sauce, Maximillian Petty, chef at Eden Hill, likes to create a fluid gel to garnish a turkey plate. Make a gel, put it in a squeeze bottle, and decorate to your heart’s content. Note: Agar agar is a vegan gelling agent derived from seaweed. It comes in powder and flake forms, so follow the instructions on the back of the container to make the hard gel.
Maximillian's recipe
Simplify
To really go all in, start by making your own cranberry juice. The juice can be sweetened to your liking and used for this, and then cocktails if you have any leftovers.
For the cranberry juice:
4 cups fresh cranberries
4 cups water
½ cup fresh orange juice
½ cup lemon juice
½ cup simple syrup
Place water and cranberries in pot and bring to a boil. Simmer for 25 minutes, or until the cranberries begin to pop.
Remove from heat and place in a food mill. Churn through the mill and place in a bowl.
Add the orange juice and simple syrup. Season to your liking by adding more of either to reach the appropriate sweetness.
Pass the mixture through a fine strainer, and chill the finished juice in the refrigerator.
For the gel:
1 quart of cranberry juice mixture
1 ½ tablespoons agar agar (or follow the instructions on the package)
Place 1 quart of cranberry mixture in stainless steel pot. Whisk in agar agar until fully emulsified. Slowly bring to a simmer, and simmer for 3 minutes.
Pour hot mixture in a pan to cool and set, about an hour.
Once the juice has fully set, it should be like hard Jell-O. Place it in a blender in chunks and blend until a smooth gel is formed. If it is hard to spin, add a touch of the juice mixture to the blender to slightly thin it out.
Once the gel is very smooth, place it in a squeeze bottle. Garnish your turkey and stuffing plate with dots of cranberry fluid.
To make the simple version of this recipe, start with a bottled cranberry juice. Note that some cranberry juices are completely unsweetened, and are quite tart. If you start with one of those, sweeten to your liking with simple syrup before making the gel.
For the gel:
1 quart bottled cranberry juice
1 ½ tablespoons agar agar (or follow the instructions on the package)
Place 1 quart of cranberry mixture in stainless steel pot. Whisk in agar agar until fully emulsified. Slowly bring to a simmer, and simmer for 3 minutes.
Pour hot mixture in a pan to cool and set, about an hour.
Once the juice has fully set, it should be like hard Jell-O. Place it in a blender in chunks and blend until a smooth gel is formed. If it is hard to spin, add a touch of the juice mixture to the blender to slightly thin it out.
Once the gel is very smooth, place it in a squeeze bottle. Garnish your turkey and stuffing plate with dots of cranberry fluid.
Cranberry Pie from Kate McDermott, author of “Art of the Pie”
Whether you make it in pie form, or take the simpler approach and make the rustic tart, this cranberry filling is great for the fall when you are craving the bright taste of a sour cherry pie. Add pecans to this filling if you’d like, as well as some orange zest or liqueur, and serve it with champagne.
Make it a pie
Make it a tart
Cranberry Pie
Makes one 9-inch shallow pie
1 quart, about 4 cups, whole cranberries, fresh or unthawed frozen, divided
1¼ cups sugar
2½ teaspoons cornstarch
A pinch or small grating of freshly ground nutmeg
¼ teaspoon salt
½ teaspoon fresh orange zest or 1 tablespoon orange liqueur
½ cup chopped walnuts (optional)
1 recipe double-crust pie dough (pre-made, or your favorite will work, or make Kate McDermott’s recipe)
1 knob butter, the size of a small walnut, cut into small pieces for dotting the top of the filling
1-2 teaspoons sugar, for sprinkling on top of the pie
Egg wash
1 egg white plus 1 tablespoon water, fork-beaten
Place 3 cups of the cranberries in a food processor and pulse until they are slightly chopped. In a medium bowl, place the chopped and remaining whole cranberries, sugar, cornstarch, nutmeg, salt, zest or liqueur, and optional walnuts, and mix well.
In a pie plate lined with unbaked pie dough, pour in the cranberry filling and dot with butter.
Roll out the remaining dough, lay it over the fruit, and cut 5 to 6 vents on top, or cut strips and make a lattice top. Trim excess dough from the edges and crimp.
Chill the pie for a minimum of 1 hour before baking.
Lightly brush some of the egg-white wash over the entire pie, including the edges.
In an oven preheated to 375 degrees, bake on the middle rack for about 40 minutes. When there are about 10 minutes of bake time left, open the oven, pull the pie out, and quickly and evenly sprinkle the top of the pie with sugar. Close the oven and bake until the crust is just golden, or until you see steady bubbling coming out between the vents.
Remove the pie from the oven and cool completely before serving.
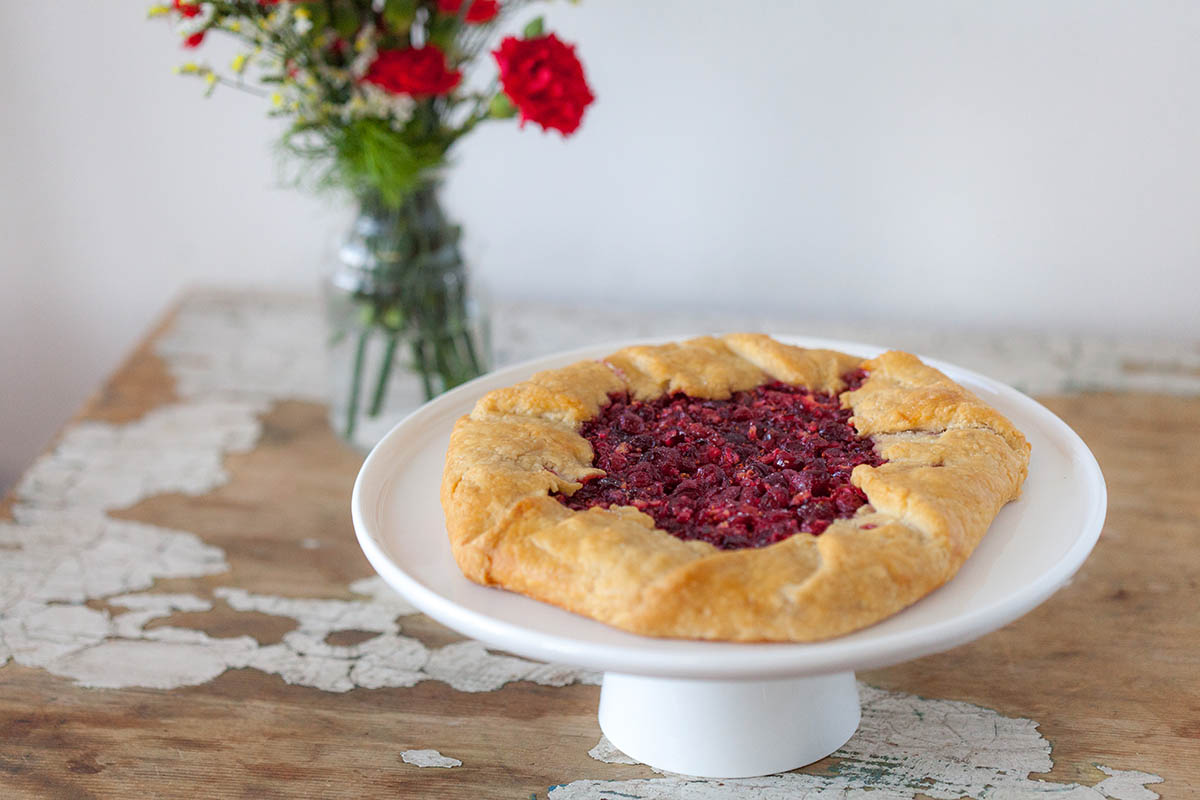
Rustic Cranberry Tart
In France, these are known as gallettes; in Italy, crostata. The amount and kind of filling you put inside doesn’t have to be exact.
Makes 2 tarts
1 recipe double-crust pie dough (pre-made, or your favorite will work, or make Kate McDermott’s recipe)
2 cups whole cranberries, fresh or unthawed frozen, divided
¾ cup sugar
1 ¼ teaspoons cornstarch
A pinch or small grating of freshly ground nutmeg
Pinch salt
½ teaspoon fresh orange zest or 1 tablespoon orange liqueur
Egg wash: 1 egg white plus 1 tablespoon water, fork-beaten
To make the filling:
Place 1 ½ cups of the cranberries in a food processor and pulse until they are slightly chopped. In a medium bowl, place the chopped and remaining whole cranberries, sugar, cornstarch, nutmeg, salt and zest or liqueur, and mix well.
To assemble the tart:
Roll the dough out to about 14 inches (35 centimeters) in diameter and about a ¼-inch (.6-centimeter) thick and place on a parchment-covered sheet pan or cookie tin.
Spread pie filling in the middle of the dough, leaving a 2- to 3-inch (5- to 7-centimeter) border.
Fold the edges of the dough up and over the filling and overlap, leaving an opening in the center.
Chill in the fridge or freezer for 30 minutes until the dough is firm. Preheat the oven to 425 degrees.
Lightly brush some of the egg white wash over the edges, and sprinkle with some extra sugar.
Bake for 10 minutes, then turn the oven down to 375 degrees and bake for 30 minutes more, until golden brown.